
Microgreens are smaller than baby plants and bigger than sprouts, they are harvested just after becoming sprouts in their second stage. Microgreens are becoming more and more popular these days.
There are basically two reasons behind it. The first one is that microgreens are a nutritional powerhouse. Secondly, just by garnishing them makes your Instagram photos picture-perfect.
Apart from the fact that they are beautiful to garnish, they also are highly nutritious. They are one of the most nutrient-dense foods, This study proved that microgreens are 4 – 40 times more nutritious than their fully grown plant. They are also very good for your heart.
Earlier microgreens were only used in high-end restaurants or fine dining, but now they are being used more and more by the public. It is happening mostly because they are very easy to grow, you can grow them all year long, and the supplies you need to grow them like seeds, growing medium, etc. are very cheap and easily accessible (you can buy almost all of the supplies you need to grow microgreens at your home on Amazon)
Here we are going to discuss how to grow microgreens hydroponically or without soil. See, there are basically two ways to grow microgreens, with or without soil. And both of these ways have their own pros and cons. But in this article we are only going to discuss, how to grow them without soil – Hydroponically.
Hydroponic gardening is a way to grow plants without soil. Rather than using soil as a growing medium you can use Rockwool, coco peat, perlite, sand, etc.
There are numerous benefits of growing microgreens hydroponically like-
- You can grow them all year round
- It will maximize your space
- It’s much easier and less messy, you can also set up a countertop garden in your kitchen
Now let’s get started on how to exactly grow microgreens without soil at your home.
First, let’s discuss all the supplies you’ll need to get started.


- Seeds – There are many sources to get your seeds from – you can go to your local nursery, online retailers, Amazon, etc. But the main thing to remember is that we want seeds for growing microgreens specifically, so ensure that they are not treated with any kind of artificial products. Here’s a good mix of microgreens seeds on amazon, to start your first batch you’ll have plenty of options to choose from.
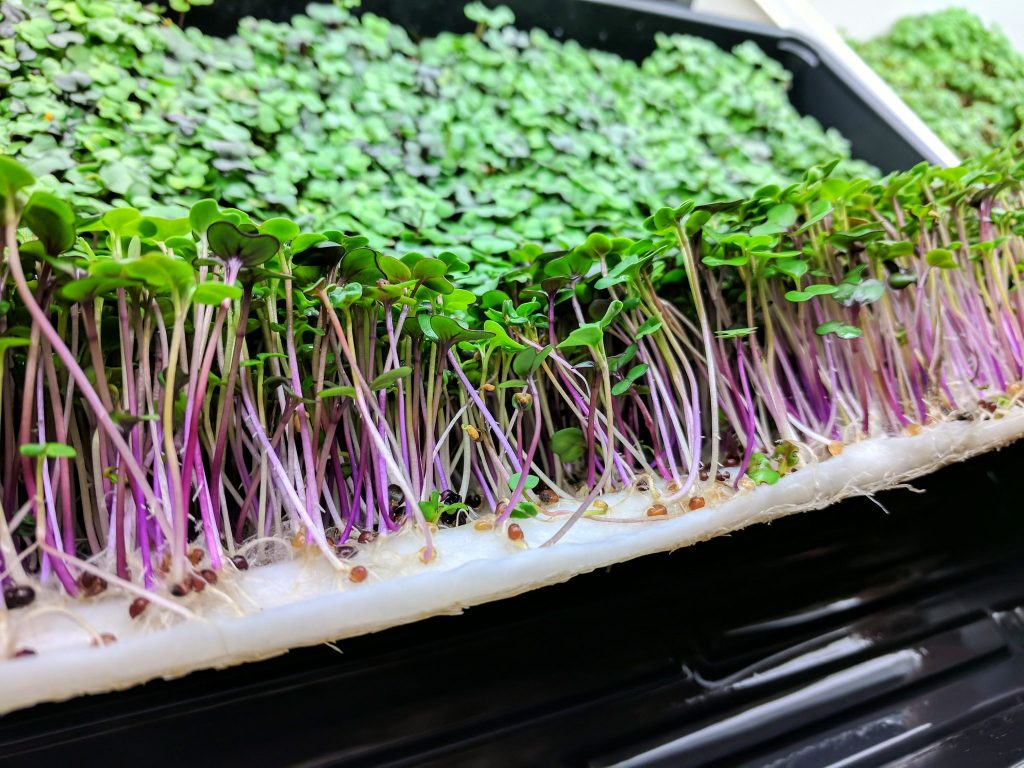
- Growing Medium – There are many possibilities here, but as per my experience you should either go for coconut coir, or hemp growing mat – These types of mats are really good for growing microgreens specifically.
- Growing Trays – You’ll need a tray to grow your microgreens. You can use any tray you can find in your home or even the office maybe. The tray should be around 1.5 inches to 2 inches deep and 20 * 10 inches should be the length and width respectively. As we are going to grow it hydroponically we don’t want any holes in our tray. If you can’t find a good tray to use in your home, check out this tray.
- pH testing kit – The pH of your water will affect the growth and health of your microgreens. Most microgreens grow better when they are grown with water that has a pH of around 6. That’s why we need a pH testing kit to test the pH of your water, and then after testing the pH, you can adjust it as per your needs.
- Light – After 4-5 days we’ll need light for them to grow and start the photosynthesis process. You can either get some good LED grow lights or use direct sunlight. If you get good sunlight in your balcony or kitchen, there’s no need to get an LED grow light.
So basically, these are all the things you’ll need to grow microgreens at your home.
Now collect all the things mentioned above in one place and then we will start preparing the growing medium and tray to start growing.
- Preparing the growing medium – First, you’ll need to decide which growing medium you want to use. As mentioned earlier, I would recommend going either for coconut coir or hemp growing mats. Coconut coir is cheaper but growing mats are easy to use and less messy. Though both will get the job done there’s not much of a difference in the output of the microgreens.
So if you are going to select coconut coir, then you need to prepare it beforehand. Take the coconut coir in a big bucket and add water in the bucket (to know how much water to add – see instructions on your coconut coir packaging), Then stir and mix it well till it converts into a soil-like consistency. After around thirty minutes drain the excess water, and your growing medium is ready to use.
If you are going to use growing mats, there’s nothing to do much. You just take it out of the packaging and moist it beforehand. Mist it with a sprayer 10-20 times, so that it’s moist and wet.
- Preparing Water – The most important thing, we need to take care of while growing hydroponically is the water. Microgreens grow better with water that has a pH of around 6. So I would highly recommend getting a pH testing kit and test your water. If your tap water is not that great, then you can use mineral water or boiled water.
After checking the pH, most definitely you’ll need to adjust the pH to get it as close as possible to 6. Let’s say after testing your pH level is 4, now you’ll need to increase it – you can do this by adding baking soda, fresh lemons, etc. and then test again till you get it closest to 6. Remember you just need to do this one time, and after that, you can store the water and use it the next couple of times.
Now we have collected and prepared everything we need, Let’s start doing the actual work. I will show you step by step below.
Step 1 – Place the prepared growing medium in the tray. If you are using coconut coir, then spread it evenly throughout the tray and ensure that it’s filled up to 1 inch in the tray. And if you are using growing mats, then you just need to place one mat in the tray.
Step 2 – Now place the seeds around 2 or 3 tablespoons (according to the instructions on the packaging of the seeds you are using) evenly on the prepared tray. The important thing to note while evenly spreading the seeds is to ensure that you are either not leaving any spot without seeds or putting too many seeds in one particular spot. Doing any of that will result in a bad quality microgreens.
Remember, we are going to harvest it in a couple of weeks – while they are just a little bit grown, so they don’t need much room to grow. Hence we can keep spread the seeds near each other throughout the entire tray.
Step 3 – After placing the seeds, moist them with a sprayer. Then cover the tray with another tray that is also moist or keep in a dark area. We will keep our tray in a dark area for the next 3-4 days until germination. Also ensure that the area is warm, around 30 degrees.
Now, for 3-4 days keep your tray in a dark and warm area, while there’s some room for air so that it can breathe – don’t completely cover the tray. Keep moistening the tray every 12 hours with sprayer – spray around 20 times every time and use the adjusted pH water only.
Step 4 – After 3-4 days, or after germination starts – we will need to give our tray light so that it can start photosynthesis. You can either put it in direct sunlight or use a LED grow light.
For the next 9-10 days don’t water the microgreens directly, instead pour a cup of water in the tray, and after 10-20 minutes remove the access water from the tray. It’s called the dry and soak method. But remember to do it every day without fail till harvesting.
Step 5 – Now, all you have to do is harvest the crop. Most seeds will be ready to harvest in 10-14 days. To ensure that you are harvesting at the right time, look out for the first set of true leaves. If you find the first set of true leaves, it means that it is the perfect timing for harvesting your microgreens.
To harvest the greens, take a pair of scissors and cut the microgreens just above our growing medium so that we don’t cut the roots together also.
Step 6 – After harvesting, it’s highly recommended that you use them the same day. As the nutritional value and freshness diminish each passing day.
Though, if you can’t use them the same day for any reason, then at least store them properly. The best way to store microgreens is to keep them between damp paper towels in a cool place (the temperature should be around 36° f). Storing like this, they’ll last 4-5 days, but in my opinion – use it in a day or two if possible.
Some people might advise you to keep your freshly cut microgreens in a sealed bag or airtight container, but never ever do that. Microgreens need some air to breathe, and storing it in a sealed bag is not a good idea.
Conclusion
Overall, it’s very easy to grow microgreens without soil. Let’s summarize what I explained above –
- First, you need these supplies – seeds, growing medium, pH testing kit, growing trays, and light.
- Then you need to prepare the growing medium, growing tray and test your water.
- Then you need to sow your seeds and keep watering the tray for 3-4 days, while your tray is in a dark and warm area.
- Then you need to stop spraying direct water and use the soak and dry method for watering and now for the next week or so, keep the tray in light.
- And after 10-14 days your microgreens will be ready to harvest.
This was the overall guide on how to grow microgreens without soil. Microgreens will be a great addition to your everyday meals, it’ll make your food look vibrant and colorful. Kids these days won’t eat greens that easily, but they’ll enjoy the microgreens on their sandwich. If you have any questions or suggestions or constructive criticism, feel free to comment below.
I’ve been buying microgreens while I go to uni to try to get more nutrients in, but it’s killing my budget. Going to try this thanks.
How long does it take to get these to just the right size?
I actually started growing microgreens and selling them at the local Farmer’s market to make a little extra money on the side. Just food for thought if anyone else is interested. I make fairly good money doing it too.
What is your favorite microgreen to grow?