
Every time you visit a restaurant and wonder how these dishes look so beautiful and what are these delicious tiny plants are doing in there. So here, let’s talk about these tiny plants which are called microgreens, and more particularly we will discuss about sunflower microgreens.
Microgreens are miniature plants of their full grown counterparts. They don’t only look beautiful but are also full of nutrients. Moreover, they are 100% organic as you can easily grow in your backyard as they don’t need much space. Here we will talk about the most delicious one and that is sunflower microgreen. This microgreen is a treat not only to eyes, but also to the stomach.
Let’s talk about the most important part first which grabs everyone’s attention and why not because it’s a blast of nutty flavor, which goes magically with any dish may it be salad, soup or any sandwich of your choice. Using sunflower microgreens has been always a win-win situation.
This nutty microgreen has a beautiful green color which makes any dish look vibrant and it has a crunchy texture and feel of spinach. This microgreen can surely be called as the powerhouse of nutrients as it is full of calcium and iron. The most amazing fact about this one is that it’s both stem and leaves are edible.
Before landing to any conclusion about its taste, let’s try a few quick recipes which can easily replace your existing breakfast by wooing your taste buds.
The colorful salad

Heat butter in a pan, add mixed herbs, sliced mushrooms, carrot and beetroot. Now add cherry tomato and mix well. Sauté for a few minutes and transfer the mixture into a mixing bowl, now add lime juice salt to taste and a handful of sunflower microgreen. Mix well.
Take a plate, spread any sauce of your choice and slowly add the dressing which have made. Now enjoy this colorful salad.
The nutrition powerhouse salad
Take black Kabuli chickpeas which are also known as black garbanzo beans, put it a cooker, add water and salt and cook until 4-5 whistle. Now drain out all the water and add these beans in a mixing bowl, add finely chopped onion, tomato, and cucumber mix well now add some olive oil, herb mixture, crushed peppercorn and some more salt. Lastly, add 1 cup of sunflower microgreens and some freshly squeezed lime juice. Mix well.
The sunflower Microgreens egg sandwich
Take one slice of bread, spread butter and put a slice of cheese, now add scrambled egg, chopped tomato, salt, black pepper and sunflower microgreen. Now take another slice of bread, spread butter and put on the top to make a yummy sandwich.
Try these recipes and do share your views.
Hoping these recipes tempted you to grow microgreens at your home by now. Moreover, this can also be a fun activity for your kids, as this is very easy and super fun.
Let’s start by listing down the things you will need to grow sunflower microgreen.
- Seeds –
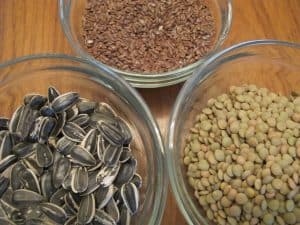 Purchasing good quality seeds is the most important part when you are planning to grow any microgreen. Talking about sunflower microgreen there are many varieties available in the market, you can take black oil sunflower seeds which are used as bird seeds and very pocket friendly. Here’s one more thing which we need to keep in mind is the quantity of the seeds.
The quantity of the seeds should match the size of the tray; through there is no fixed size of the tray you take into accounting the surface area of the soil. Take around 5-6 teaspoon of sunflower seeds for every 90-100 square inch of soil. - Growing Medium – Microgreens can be grown both ways with soil or hydroponically. Here when we talk about sunflower microgreen then the preferred medium is soil.
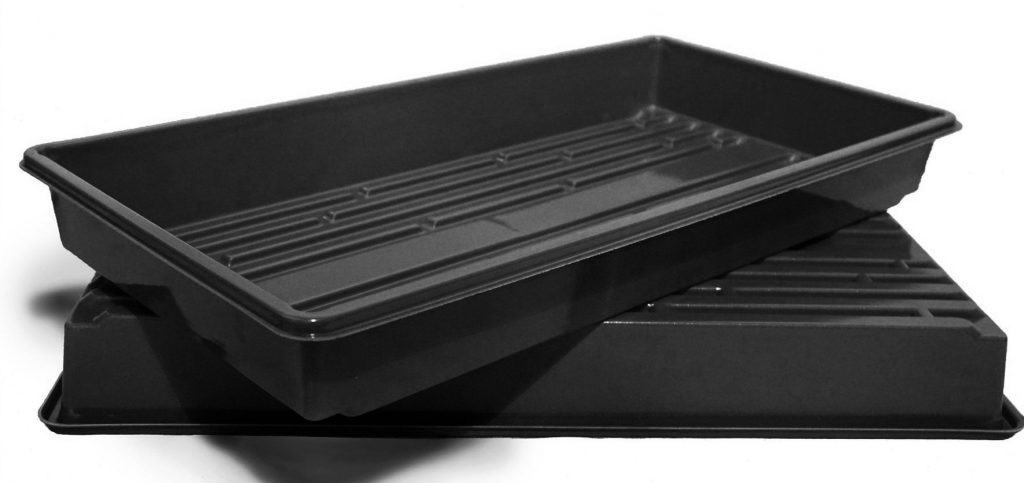
- Growing Trays –Growing microgreen don’t take much space, you can grow in any plastic box or snack box available at your home or you can buy 10×20 tray. 10×20 tray already has holes which we need when we grow microgreens in soil unlike hydroponically which don’t require holes.
- pH testing kit – Testing pH in soil is very important for good germination in water. The preferred pH in soil is around 6.0. Make sure to purchase a good pH testing kit as you need to adjust the pH if it’s not around 6.0 for germination.
- Light – Most important factor before harvesting is light; you can use good LED grow light or direct sunlight. If you are growing it in your backyard and there is enough sunlight, which covers the whole box or tray, then you don’t need to use LED grow light.
As now we have collected all the material required to start the process of growing sunflower microgreen, so now let’s follow below mentioned step by step process and grow our own 100% organic sunflower microgreen.
First you have to prepare the growing medium
First and foremost step in the process is preparing the medium. As discussed above, microgreen can be grown with or without soil, but here for sunflower microgreen we are using soil for growing.
Take water; only take that much water, which can be mixed with soil. After taking water now add potting soil also known as potting mix which generally comprises or peat, sand perlite etc. But May or may not include a small amount of soil as it is heavy for growing houseplant which are grown in small quantities. Now mix and soil together so that the soil is moist.
- Testing the pH- Now, once the medium is prepared test the pH of water with the pH testing kit and pH here should be around 6. As microgreens thrive when the pH is around 6. You don’t need to check the pH again and again, you can check once and store the rest of the water for later use.
Make sure if the pH is not balanced, then you need to balance the same by adding drops of purified water or baking soda and test again. - Soaking the seeds- Few microgreens doesn’t require pre-soaking of seeds they can be used as it is, but here for sunflower microgreen we need to soak the seeds.
For soaking the seeds take a glass jar with wide mouth and add seeds to it now add sufficient water and cover the same. Remember to maintain the room temperature. Soak them for about 8 hours in between, you need to change the water if it is not clear as we need to keep the water clean.
Drain the existing water and refill the jar with fresh water. You can soak them for 8-12 hours.
After 8-12 hours of soaking, drain all the water and leave the seeds to sprout for about next more 24 hours to germinate. They will best germinate in the dark and at room temperature. Keep rinsing them in between. Now rinse for one last time as they are ready to be sow
- Take a tray, add 4 rocks to it, keeping all 4 in different 4 corners so that there is a difference between this water tray and soil tray.
- Take a 10×20 tray and add the prepared soil and now spread the sprouted seeds evenly, make sure to spread the seeds evenly all over the soil. Now keep this tray on the water tray as while growing this microgreen we will water them from the bottom.
- Now cover the soil tray with another tray so that there is a complete blackout. Leave the tray covered like this for another 3- 4 days until you see leaves popping up. Keep watering them with a spray bottle to keep it moist at all times.
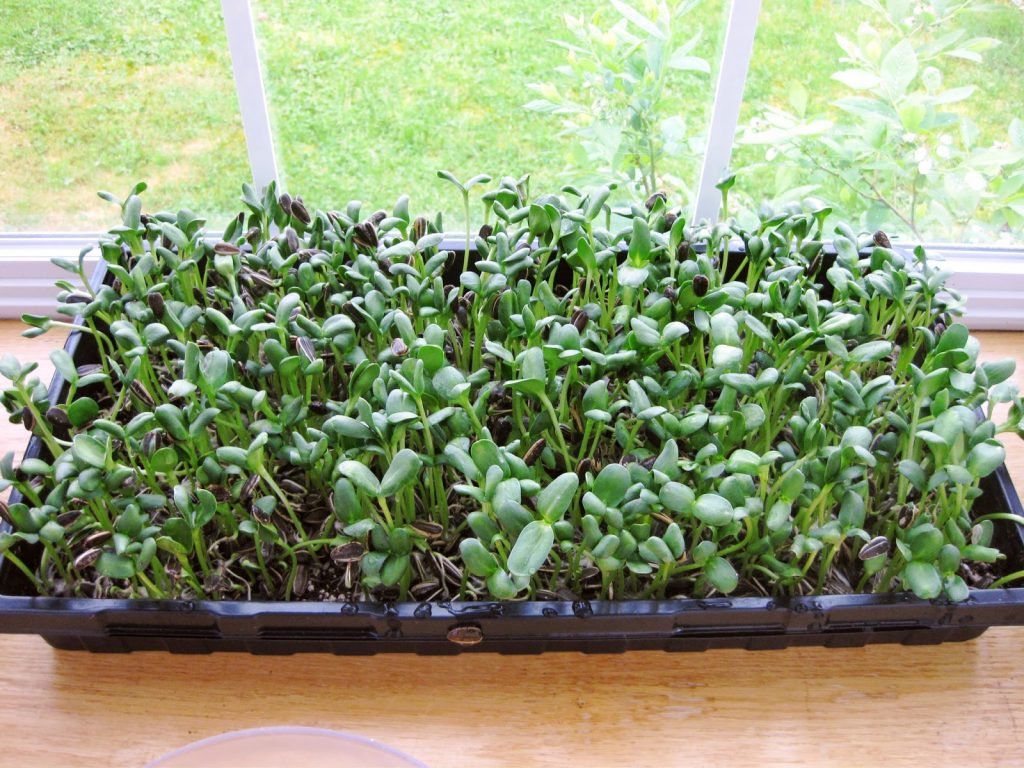
- Once the leaves have started germinating keep it in direct sunlight for about 8-9 days until you see the leaves turning green, keep watering them twice a day to keep them moist. The height of the microgreens depends upon the time you keep them; they will grow higher with age.
Once they have reached the medium height that means now they are ready to be harvested. You should also keep plucking and tasting in between to check the taste. Once they taste fine not bitter then they can be harvested.
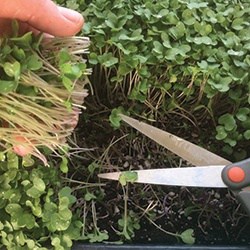
Take a pair of scissors and cut the sunflower microgreen from near the soil.If you are going to harvest the microgreens the next day, then do not water the same today as while storing them we don’t want to keep it dry.
- It’s always advised to consume the harvested sunflower microgreen the same day, but they can be used for next 3-4 days if stored in-between a damp cloth so they don’t get too dry and are fresh while serving.
Quick tips:
- These microgreens are best grown in summer season.
- The quality of the seeds which you purchase is very important; always make sure you purchase a good quality seed.
- Double check the pH.
- Pre-soaking is very important.
- Ample amount of sunlight is very important if there is no proper sunlight, then the color will be pale green, whereas the if there is good sunlight, then the color of the leaves will be dark green with slightly red streaks.
- They can be stored, but not for too long, they taste best when they are fresh.
Conclusion
This is the most simple and easy way to grow sunflower microgreen, let’s take a quick recap of the things we just covered.
- Mark the things you need good quality seeds, growing medium, growing trays, pH testing kit and light.
- The process includes, prepare the growing medium, growing tray and testing pH and pre-soaking.
- You need to water this microgreen from the bottom.
- The Pre-soaking process needs changing the water when required as we need clear water.
- You need to drain water and keep it for germination.
- Keep in sunlight for about 8-9 days.
- Check the height and taste to know when they are ready to be harvested.
Right from discussing the flavor to texture to the process we tried to discuss everything here, even the recipes, so that you can grow this microgreen at your home with ease.
Still, if you face any issue with growing it, do let us know or just share your experience.
I didn’t know you could grown sunflowers as microgreens. Cool beans, learn something new every day.